
[Day-42] vue 컴포넌트 심화
Chap.8
컴포넌트 심화 학습
1. 컴포넌트 안에 다른 컴포넌트 사용하기
1) 부모 컴포넌트와 자식 컴포넌트
- 컴포넌트에서 다른 컴포넌트를 사용하는 방법
사용할 컴포넌트를 import한 후,
현재 컴포넌트의 템플릿에서 사용할 컴포넌트를 components에 등록
<template>
<div>
    <pageTitle />
</div>
</template>

<script>
import PageTitle from '../components/PageTitle';
export default {
    components: {PageTitle}
}
</script>
2) 부모 컴포넌트에서 자식 컴포넌트로 데이터 전달하기 : Props
<template>
  <h2>{{title}}</h2> // props에 정의된 키는 Vue 인스턴스의 데이터 값 이중괄호 사용해 문자열에 대한 데이터 바인딩 처리
</template>

<script>
export default {
    props: {
        title: {
            type: String,
            default: "페이지 제목입니다."
        }
    }
}
</script>
<template>
<div>
    <pageTitle title="부모 컴포넌트에서 자식 컴포넌트로 데이터 전달"/>
    //지정한 title의 값이 자식 컴포넌트의 PageTitle에 정의된 props의 title에 전달
</div>
</template>

<script>
import PageTitle from '../components/PageTitle';
export default { // 전달되지 않았을 때의 default 값
    components: {PageTitle}
}
</script>
3) 부모 컴포넌트에서 자식 컴포넌트의 이벤트 직접 발생시키기
(부모 컴포넌트에서 자식 컴포넌트의 버튼을 클릭하는 이벤트
ㆍ ref="id" 지정 (ref는 유일한 키 값 사용)
=> Vue 컴포넌트의 함수에서 this.$refs를 통해 접근 가능
//ChildComponent.vue

<template>
<button type="button" @click="childFunc" ref="btn">click</button>
</template>

<script>
export default {
    methods: {
        childFunc() {
            console.log('부모 컴포넌트에서 직접 발생시킨 이벤트');
        }
    }

}
</script>
//ParentComponent.vue
<template>
<child-component @send-message="sendMessage" ref="child_component" />
<!-- 부모 컴포넌트에서 자식 컴포넌트인 child-component에 ref="child_component”를
지정하여, $refs로 접근할 수 있도록 함 -->
</template>
<script>
import ChildComponent from './ChildComponent'
export default {
components: { ChildComponent },
mounted() {
this.$refs.child_component.$refs.btn.click();
}
}
</script>
4) 부모 컴포넌트에서 자식 컴포넌트의 함수 직접 호출하기
// ChildComponent2.vue

<template>
<div></div>
</template>
<script>
export default {
    methods: {
        callFromParent() {
            console.log('부모 컴포넌트에서 직접 호출한 함수');
        }
    }

}
</script>
// ParentComponent2.vue
<template>
<child-component @send-message="sendMessage" ref="child_component" />
</template>
<script>
import ChildComponent from './ChildComponent2'
export default {
components: { ChildComponent },
mounted() {
this.$refs.child_component.callFromParent();
}
}
</script>5) 부모 컴포넌트에서 자식 컴포넌트의 데이터 옵션 값 직접 변경하기
// ChildComponent3.vue

<template>
<h1>{{msg}}</h1>
</template>
<script>
export default {
    data() {
        return {
            msg: ''
        };
    }
}
</script>
//ParentComponent3.vue
<template>
<child-component @send-message="sendMessage" ref="child_component" />
<button type="button" @click="changeChildData">Change Child Data</button>
</template>
<script>
import ChildComponent from './ChildComponent3';
export default {
components: {ChildComponent},
methods: {
changeChildData() {
this.$refs.child_component.msg = "부모 컴포넌트가 변경한 데이터";
}
}
}
</script>6) 자식 컴포넌트에서 부모 컴포넌트로 이벤트/데이터 전달하기(커스텀 이벤트) : $emit
- 부모 컴포넌트에서 자식 컴포넌트인 ChildComponent를 import 하고, 커스텀 이벤트 (@send-message)를 정의
커스텀 이벤트인 send-message는 자식 컴포넌트에서 컴포넌트 심화 학습 $emit으로 호출
//ChildComponent4.vue

<template>
<h1>{{msg}}</h1>
</template>

<script>
export default {
    data() {
        return {
            msg: '자식 컴포넌트로부터 보내는 메시지'
        };
    },
    mounted() {
        this.$emit('send-message', this.msg)
    }
}
</script>
//Parent4.vue
<template>
<child-component @send-message="sendMessage" />
</template>
<script>
import ChildComponent from './ChildComponent4';
export default {
components: {ChildComponent},
methods: {
sendMessage(data) {
console.log(data);
}
}
}
</script>
7) 부모 컴포넌트에서 자식 컴포넌트의 데이터 옵션 값 동기화하기: computed
- computed 옵션 자식 컴포넌트의 데이터가 변경될 떄마다
$emit를 통해 변경된 데이터를 전송하지 않아도 변경된 데이터 값을 항상 확인 가능
//ChildComponetn5.vue

<template>
    <button type="button" @click="childFunc" ref="btn">자식 컴포넌트 변경</button>
</template>

<script>
export default {
    data() {
        return {
            msg: '메시지'
        };
    },
    methods: {
        childFunc() {
            this.msg='변경된 메시지';
        }
    }
}
</script>
//ParentComponent5.vue
<template>
<button type="button" @click="checkChild">자식 컴포넌트 조회</button>
<child-component ref="child_component" />
</template>
<script>
import ChildComponent from './ChildComponent5';
export default {
components: {ChildComponent},
computed: {
msg() {
return this.$refs.child_component.msg;
}
},
methods: {
checkChild() {
alert(this.msg);
}
}
}
</script>
2. Slot
slot
컴포넌트 내에서 다른 컴포넌트를 사용할 때 쓰는 컴포넌트의 마크업을 재정의하거나 확장하는 기능
컴포넌의 재활용성을 높여주는 기능
- 팝업 창
팝업창 사용할 일 많은데 그 많은 팝업 매번 정의할 거야?
심플하게 하나 만든 다음에 값만 조금씩 바꾸는 방식
일반적으로 팝업창은 header, main, footer로 이루어짐
좋은 애플리케이션은 단순한 팝업창일지라도 모든 팝업창의 디자인을 유형에 따라 동일하게 유지시킴.
그래야 사용자에게 동 일한 사용자 경험(UX)을 줄 수 있기 때문
=> 이때 Slot을 이용
v-slot:(slot 이름) 또는 #:(slot 이름)
//SlotModalLayout.vue

<template>
    <div class="modal-container">
        <header>
            <slot name="header"></slot>
        </header>
        <main>
            <slot></slot>
        </main>
        <footer>
            <slot name="footer"></slot>
        </footer>
    </div>
</template>

<style scoped>
.modal-container{
    border: 1px solid #ddd;
}
</style>
//SlotUseLayout.vue
<template>
<modal-layout>
<template v-slot:header>
<h1>팝업 타이틀</h1>
</template>
<template v-slot:default>
<p>팝업 컨텐츠1</p>
<p>팝업 컨텐츠2</p>
</template>
<template v-slot:footer>
<button type="button">닫기</button>
</template>
</modal-layout>
</template>
<script>
import ModalLayout from './SlotModalLayout.vue'
export default {
components: { ModalLayout },
}
</script>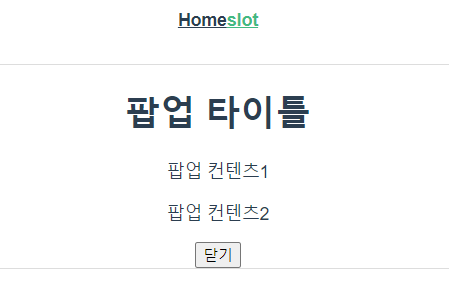
3. Provide/Inject
컴포넌트 계층 구조가 복잡하게 얽혀있을 경우
부모 컴포넌트에서는 provide옵션, 자식 컴포넌트에는 inject옵션
장점: 아무리 컴포넌트 계층 구조가 복잡하더라도 원하는 자식 컴포넌트로 데이터를 한 번에 전달 가능
(*props 사용하면 복잡)
단점: 자식 컴포넌트에서는 전달받는 데이터가 어떤 부모 컴포넌트에서 전달되는지 확인이 안됨
// ProvideInjectChild.vue

<template>
<div></div>
</template>
<script>
export default {
  inject: ['itemLength'],
  mounted() {
    console.log(this.itemLength);
  }
}
</script>
// ProvideInject.vue
<template>
<div>
<ProvideInjectChild />
</div>
</template>
<script>
import ProvideInjectChild from './ProvideInjectChild';
export default {
components: {ProvideInjectChild},
data() {
return {
items: ['A','B']
};
},
provide() {
return {
itemLength: this.items.length
};
}
}
</script>
4. Template refs
Vue 개발 시 어쩔 수 없이 자바스크립트에서 HTML 객체에 바로 접근 해야 한다면 HTML 태그에 id 대신 ref를 사용
this.$refs를 이용해서 ref 속성에 지정된 이름으로 HTML 객체에 접근이 가능
<input type="text" ref="title" />
this.$refs.title.focus();
chap.09
Resuability & Composition
1. Composition API
1) Composition API
- Composition API 란?
특정 기능을 갖는 코드를 유연하게 구 성하여 사용할 수 있도록 Vue 3 버전에 추가된 함수 기반의 API
Setup이라는 메소드 안에서 한 덩어리로 코드를 구현할 수 있어서 코 드에 대한 관리가 훨씬 쉬워짐
궁극적인 목적인 코드에 대 한 재활용성을 높이고, 코드의 가독성을 높이기 위해 추가된 기능
- 사용하는 이유
믹스인을 통해 코드를 재사용하였지만 오버라이딩 문제나, 다중 믹스인을 사용하는 경우 코드에 대한 관리가 어려웠음
컴포지션 API로 개발하면
연관성 있는 로직을 같이 구현할 수 있어서 훨씬 코드가 간결해지고 코드 추적 및 유지 관리가 쉬워짐
동일한 프로그램 로직과 관련된 코드를 함께 배치할 수 있음
2) Setup
setup 컴포지션 API를 구현하는 곳
①

②
reactive와 computed를 이용하니까 input type=text에 바인딩했던 keyup 이벤트를 없앨 수 있고, 코드가 훨씬 간결해졌습니다.
③
작성한 코드를 여러 컴포넌트에서 재사용할 수 있도록 함수를 분리해야 합니다
Setup에 작성된 코드를 분리해서 별도의 function으로 작성하겠습니다.
toRefs를 사용하여 컴 포넌트 밖에서도 반응형 처리가 가능하도록 할 수 있습니다
④
Vue 컴포넌트에서는 다음과 같이 common.js로 import해서 사용하면
3) Lifecycle Hooks
4) Provide / Inject
provide와 inject를 별도로 import 해야 사용가능
부모 컴포넌트에서는 provide 함수를 통해서 전달할 값에 대한 키(key), 값(value)을 설정
자식 컴포넌트에서는 inject를 이용해서 부모 컴포넌트에서 정의한 provide 키로 데이터를 가져옴
//CompositionAPIProvide.vue

<template>
  <CompositionAPIInject />
</template>

<script>
import { provide } from 'vue';  //provide 추가
import CompositionAPIInject from './CompositionAPIInject';

export default {
  components: {
    CompositionAPIInject
  },
  setup() {
    provide('title', 'Vue.js 프로젝트');  //provide 함수를 통해서 전달 할 키(key), 값(value) 설정
  }
}
</script>
//compositionAPIInject.vue
<template>
<h1>{{title}}</h1>
</template>
<script>
import { inject } from 'vue'; //inject 추가
export default {
setup() {
const title = inject('title'); //inject를 사용해서 provide에서 정의한 키(key)로 데이터를 전달 받음
return {title};
}
}
</script>
2. 믹스인(Mixins)
Vue에서도 이렇게 공통모듈에 해당하는 파일을 만들어서 사용할 수 있는데, 그 중 하나의 방법이 믹스인
믹스인(mixin)은 기능을 따로 구현하고, 필요할 때마다 믹스인 파일을 컴포넌트에 결합해서 사용하는 방법
1) 믹스인 파일 생성
//src 폴더에 api.js 파일을 생성
//다음과 같이 axios 패키지를 이용해서 서버와의 데이터 통신을 위한 공통 함수를 작성


import axios from 'axios';

export default {
    methods: {
        async $callapi(url, method, data) {
        //함수이름에 $라는 prefix를 사용하는 이유
        //믹스인 파일을 사용하는 컴포넌트 내에 동일한 메소드명이 있어서 오버라이딩 되는 것을 방지
            return (await axios({
                method: method,
                url,
                data
            }).catch(e => {
                console.log(e);
            })).data;
        }
    }
}
// mixins 프로퍼티에 사용할 믹스인 파일을 정의해서 사용
//Mixins.vue
<template>
<div></div>
</template>
<script>
import ApiMixin from '../api.js';
export default {
mixins: [ApiMixin], //사용할 믹스인 파일을 배열로 등록
data() {
return {
productList: []
};
},
async mounted() {
this.productList = await this.$callAPI("https://29b6d42b-2a86-4cb0-ba01-8415160fabef.mock.pstmn.io","get");
console.log(this.productList);
}
}
</script>